Jake's Compilation of Video Tutorials

BackdoorArts

Senior Member
Just one quick question...since I am shooting RAW and using Lightroom, is there any way to do this in Lightroom?

(I've edited out the rest of your question because I see that as more of a workflow question. I'll answer that below.)

The quick answer to your question is, "No, there's no parallel Levels adjustment in Lightroom". But, there are ways to achieve the same result...


BackdoorArts

Senior Member
Just one quick question...since I am shooting RAW and using Lightroom, is there any way to do this in Lightroom? If I open the RAW (or DNG) files in Photoshop first, what file format would I use to then import it into LR? The students' theater photos have such extremes between the dark areas of the stage vs the light colors of their faces that any adjustments to lighten the dark areas results in extra noise (last ones were shot at ISO 2000 so there is already some noise present). Any ideas on how I can make levels adjustments with RAW or DNG files in Lightroom?

OK, I've shown you how to do the levels-like adjustments in LR, but if you're using LR and Photoshop I highly recommend coming up with a workflow that makes sense for all your work. I believe LR's power is in its organization and catalog management - having full blown ACR at your fingertips is a major plus. So 100% of my work starts in Lightroom. I import into Lightroom and apply lens profile correction as a default. From there, I make any WB adjustments as required and whatever other ACR-type light adjustments the photo needs. I never do Noise Reduction in Lightroom or ACR as I find Nik's Dfine 2.0 to be a far superior tool (one of these day's I'll document what my brother did with Nik Dfine and how he's profiled every camera he has at each ISO setting so he can apply a predefined, perfectly adapted Dfine profile for that camera sensor and ISO level - he's a maniac). I also never open a RAW file directly into Photoshop unless I'm working on someone else's stuff and don't want to import it into my catalog. So, I have all my NEF/DNG files in Lightroom with the ACR adjustments applied and stored in the LR Catalog.

Once I've applied the PS adjustments I save the file as a PSD file back into the LR catalog, and it will sort them together with the original NEF. Once I have this PSD file I almost never go back to the RAW file and will continue to work the PSD file until it's finished. When it is, I use it to produce my various JPEGs as required - either for sharing or for printing (I print from appropriately sized JPEG's, not from the PSD file).

Hope that helps.
 

hark

Administrator
Staff member
Super Mod
(I've edited out the rest of your question because I see that as more of a workflow question. I'll answer that below.)

The quick answer to your question is, "No, there's no parallel Levels adjustment in Lightroom". But, there are ways to achieve the same result...


This is excellent info, Jake. Thank you for taking the time to explain it. I rarely ever move the blacks and whites sliders in LR so now I have a much better idea of how to do this. Your explanations are very thorough. :cool:
 

BackdoorArts

Senior Member
This is excellent info, Jake. Thank you for taking the time to explain it. I rarely ever move the blacks and whites sliders in LR so now I have a much better idea of how to do this. Your explanations are very thorough. :cool:

You don't ever have to set the edge markers for blacks and whites, but once you do it greatly enhances the impact of every other adjustment. It's a good habit to get into.
 

hark

Administrator
Staff member
Super Mod
You did a lot of things that I'm not familiar with--but watching this makes me want to learn more about post processing. ;)

Two comments:

  1. This first one is for those who wish to participate in this month's photo assignment (nifty fifty)...At about 1:15 Jake shows the effects of blurring the background. If you don't have a really fast lens, you can still create more background blur in your photos. It's a good example of the before and after effect. So even if you don't have a f/2.8 or f/1.8 lens, you can still achieve similar effects.
  2. Secondly, Jake you sent the file from LR to PCC then back to LR. What file format did you use to go from PCC to LR? Can LR open PSD files?
Nice job with the video. I'll certainly be viewing this several times to learn more. :cool:
 

BackdoorArts

Senior Member
Two comments:

  1. This first one is for those who wish to participate in this month's photo assignment (nifty fifty)...At about 1:15 Jake shows the effects of blurring the background. If you don't have a really fast lens, you can still create more background blur in your photos. It's a good example of the before and after effect. So even if you don't have a f/2.8 or f/1.8 lens, you can still achieve similar effects.
  2. Secondly, Jake you sent the file from LR to PCC then back to LR. What file format did you use to go from PCC to LR? Can LR open PSD files?
Nice job with the video. I'll certainly be viewing this several times to learn more. :cool:

Answering your question first, you can set the handshake between LR and PS to either be TIFF or PSD files. I prefer the latter. No real reason, I just do. No significant difference in size.

As for the blur tool, let's just say that I've spent many long hours with it, and it's a cruel mistress when you try to use it to really replicate bokeh as it would exist with a faster lens. Had my subjects been closer and had more sharply defined lines against a less busy background I could have spend significant time trying to eliminate the ghosting that comes with a slightly off blur. So while hark is right to some degree, my suggestion is to learn how to take advantage of the bokeh you get (or don't) and use that wisely. I rarely use it as a substitute for a large aperture, if that's what I want. 9 times out of 10 I will pull it out when I used something else that added more clarity to what's in the OOF regions and want to set it back to how it was. Just thought I should say that before a bunch of you get frustrated with brush edges, sizes and opacity levels and waste a couple hours creating "razor thin DoF at f/5.6". ;)
 
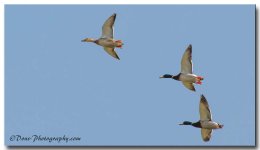
Just tried this on a Eagle pic I shot. This was a pretty extreme crop just to see how well it would hold up.

D71_0063.jpg
 

hark

Administrator
Staff member
Super Mod
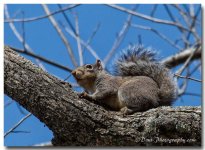
So [MENTION=6277]Don Kuykendall[/MENTION], what are your thoughts? Your photos look terrific--a little noise in the squirrel shot that can be cleaned up, but the detail is excellent. :)
 
So [MENTION=6277]Don Kuykendall[/MENTION], what are your thoughts? Your photos look terrific--a little noise in the squirrel shot that can be cleaned up, but the detail is excellent. :)

Great use of ACR TO UPSIze it is a little noisy but if you saw the original you would see why. I had to crop it a lot to get close. This was a shot I never used because it was just to far away to get a decent photo out of it. Now it is a decent photo.


Sent from my iPhone using Tapatalk 2
 

hark

Administrator
Staff member
Super Mod
Jake, quick question...did you do this with a full NEF file or a NEF converted to DNG? Thanks! :)
 
Top